Tuesday, January 28, 2014

Lamb Ribs


I can almost hear those lips smacking...

Who can resist finger lickin, napkin grabbin, fall off the bone, sticky ole ribs?


 All the talk of fabulous food bites for the upcoming Super Bowl got me motivated.

How about something that might, just might, draw the attention away from the big screen for a bit?  


potato skins, chips & dip, wings...how about something different? 


Today I'm sharing a recipe for the yummiest, easiest, most impressive little morsels...EVER

LAMB RIBS!

Think you don't like lamb?  Think again.  I have gained lamb lovers over this recipe time and time again.  I'm convinced anyway, folks that think they don't like lamb have either had a bad preparation or an older sheep.  If you consider yourself a foodie you need to give these a try.  If you want to impress your guests, this will do it, I assure you.


Finding lamb ribs will not be an easy task. I would suggest you find a lamb vendor at a farmers market, they'll have them!  Not only will they have them but lamb ribs are a very economical cut...double bonus!  As is often the case buying direct from farmers, you'll have access to cuts of meat you'd never find in your box stores.  

So enough discussion...Here's the recipe!

Lamb Ribs


ingredients: lamb ribs, spice rub, BBQ sauce


Spice Rub lamb lends itself to so many flavor profiles, Asian with soy and ginger, Mediterranean with coriander and oregano, Mexican with cumin and chili...and always garlic!  If your not feeling very creative Old Bay seasoning works great

your favorite BBQ sauce  I like a honey/molasses/mustard based sauces but I usually create something that marries well with my rub.  I'd recommend one of your ingredients be honey, molasses, syrup or even a jam you have sitting on the shelf.  Again, if your not feeling too inspired, a store bought sauce will do.   It is honestly hard to go wrong.

Remove as much fat as you can from the ribs.
Rub the ribs with dry rub and refrigerate over nite or at least 8 hours


First, we'll cook the meat.  Remove ribs and place on a foil lined baking pan.  Cover and bake at 250 degrees for 1.5 hours.  Sometimes I place them on a rack and place about 1/4 inch any fruit juice (i.e cherry, cranberry, apple, blueberry, grape) in the bottom of the pan and follow the same cooking.  


Next remove the cover and cook for another 1-1.5 hours.
At this point you could place the ribs on a grill but my oven method works great

Next, baste with your sauce every 10-15 minutes  for the next hour.  

Remove from oven.

Do you see the GOOEY?

Voila!

Too easy? 


Printable Recipe


Sunday, January 26, 2014

DIY Wool Dryer Balls


On this farm, we raise sheep. 

You'd never know from my blogs that we raise sheep, would you?  I write about farming and such and occasionally show pictures of our sheep.  I do talk about farming chores but I haven't spoken of wool, our wool specifically, the many attributes of wool in general, or the many fun and useful things you can do with it.

I think I'm way over due for a blog about wool, don't you?

I have pondered and pondered the topic of wool.  Where to begin?  I've thought about the many phases and facts regarding wool.   I get so overwhelmed with the possibilities for a blog that I put the idea away thinking I'll get back to it another day.  I read a post about knitting from a friend over on Google+ ,  Lynne Knowlton. As Lynne described getting out those knitting needles again I was quickly reminded it's the very basic stuff that folks would enjoy. 

It hit me, yes, let's make    wool dryer balls!

Stoney Mountain Farm Wool Dryer Balls

What the heck are wool dryer balls you ask?


Well they're just the coolest laundry alternative out there, of course and I am biased!

wool dryer balls:
....replacing those chemical laden dryer sheets, one household at a time ... we should all be happy about that.  


This is not intended to be an ad so please don't be offended if I send you to our website for more details about the many benefits of wool dryer balls.  Here, we're going to roll our sleeves up and make our very own felted wool balls.

If your not inclined to use them as a laundry alternative they make great pet toys, juggling balls, pin cushions, and even the base for more felting projects.   I even have one customer that adorns her home with bowls of these natural felted balls of wool, quite nicely too.

So, take this project as a crafty one...that is the intent after all!


Grey wool roving

I am going to show you how to make them...the best way!  There are alot of folks making them out of yarn and that's fine but they won't last as long.  We're going to make them from wool roving.  Roving is the wool, after it has been washed and carded.  Roving is the stage just prior to spinning the carded wool into yarn.

Maybe you have a stash of yarn on hand you'd like to use?  Whether yarn or roving, the process we are about to engage in is felting.

For this project all you will need is:

  1. wool,  I would suggest 2 ounces of roving for each ball, totaling 6 ounces. I would also suggest you make 3 wool dryer balls as the desired affects from the wool balls require a minimum of 3.  You can purchase roving from a variety of craft stores, our farm, our shop on Etsy or many others, and many other places.  I would encourage you to buy it from a farmer or someone that knows the source of the wool and how it is handled..  Like food, wool is being treated in ways you would find criminal...at least I hope you would.  Do you know 80% of the wool grown in this country is being sent to China for processing because the chemical restrictions are lighter there?  The wool then returns to you, the unsuspecting buyer.  On our farm we only send our wool to U.S. mills that do not use chemicals in any stage of the process...that's hard to find. If you want colorful wool dryer balls you can find roving that has been dyed.  We don't use any chemicals or dyes on our wool...just au naturale,  only the shades of the sheep.
  2. a sock, either mens cotton tube sock or a womens trouser sock will work
  3. rubber bands
  4. washer& dryer
  5. laundry soap
Lets Begin:

First, divide your roving into 2 ounce sections.  Don't be afraid to pull the roving apart.   We are going to roll each 2 ounce portion of roving into a ball.  If you are using yarn, the process is the same.   If your roving tears, do not fret, just pick up the next piece and keep going.
As you roll the roving be careful to always keep a round shape.  If your "ball" gets lopsided you need to focus on the underdeveloped side.  You want the ball to be taut but not tight.  Do not be afraid.  Regardless, you will have a felted ball at the end of this process.

Just keep rolling until the full 2 ounces of wool roving is used.  Round and round, trying to keep the roving from twisting as you roll.
You will want to feed the end back through your final pass.  If you are familiar with needle felting this is where you would felt the end down therefore leaving a smoother edge.

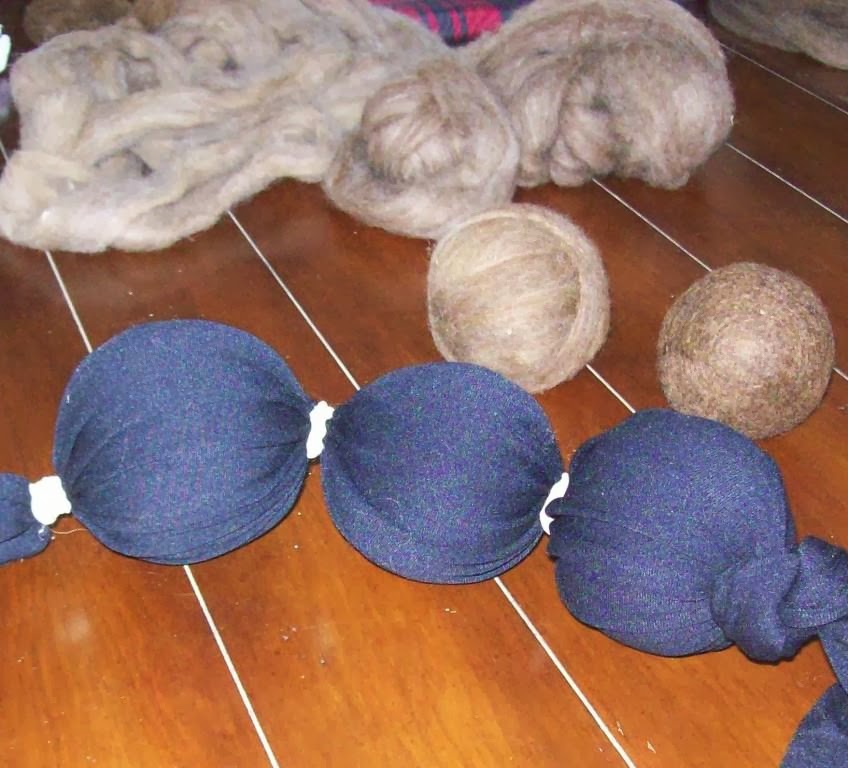
Now, your ball is ready to place in the sock.  Sometimes I put my hand in the sock first and grab the wool ball with my sock covered hand, then pulling the sock over the ball.  Tie off the sock with a knot or the rubber band,  Repeat the process until your sock is full with the 3 balls.

Now, place the sock in the washing machine in a hot soapy cycle.  Remove the sock from  the washer and run them through a dry cycle.

Remove them from the sock.

Voila!
your very own wool balls....

So easy!  

You'll be so impressed with the ease and quality of your results,  you may just become a wool junkie!


Ready to try some felting?


Wednesday, January 15, 2014

Let the New Year Begin

Another fabulous holiday moved to memories!  Another beautiful tree down and all the bits of Christmas to be packed away until the next year.  I adore the holidays so its always difficult to take it all down and pack it all away.  I felt this years tree was especially beautiful.  As I began the process of undressing the tree, winding up all the lights, removing all the adornments from all the corners,  I told my husband how sad I was.  His reply, "you always say that"!  There you have it, drama over!

 So, if you are feeling the emotional pull of the holiday past and have no outlet worthy of your drama,  just think forward to the year ahead...that's what I did.


What are New Years resolutions all about anyway?  A new year, new start?  Organization?  Planning?  Goals?  I imagine all the above would be considered sound reasoning.


According to Wikipedia a 2007 a study about new years resolutions involving 3,000 people showed that 88% of those who set New Year resolutions fail, despite the fact that 52% of the study's participants were confident of success at the beginning. Men achieved their goal 22% more often when they engaged in goal setting, (a system where small measurable goals are being set; such as, a pound a week, instead of saying "lose weight"), while women succeeded 10% more when they made their goals public and got support from their friends.

I have always been a big new years resolution gal.  I haven't had much success with them but each and every year I proclaim a few more.  I proclaim I will clean more, eat less, work harder, exercise more, be more grateful...it's a wonder I have time for everyday living.  Truth is, as the year moves forward, everyday living kicks in and all those grandiose plans are forgotten...at least until the next new year.

We set out each year planning for our farm too.  We have the same goal setting approach but try to be a bit less casual about the results, it is our livelihood after all.  In the business environment it's referred to as forecasting.


                       Forecasting is the process of making statements about events whose actual 
                        outcomes (typically) have not yet been observed....wikipedia

Sounds like "resolutions" to me


In 2014 we plan to grow our flock.  Calling it resolutions or forecasting matters not,  our motivations are the same. We established a goal, based on previous results.  We simply recognized that demand exceeds supply.  We did some forecasting and set a goal.  Our goal was achievable because our farm, our acreage to be exact, can support more sheep.  


At the core of our mission, always, is to raise healthy happy animals and that means providing the proper conditions. Plain and simple, there needs to be enough good quality grass for the number of sheep.  

Our goal:doable! 

Truth is each year on the farm we make lots of plans.  We plan not to have any noxious weeds in our pasture, each year we do.  Each year we plan not to loose sheep, each year we do.  

Each year I am made very aware that we are not in control here.  Each year I am reminded, no matter our desired outcome, mother nature will preside over the results.  

Whether in our personal lives or our businesses, we set each new year in motion hoping to create some modem of control, yet it is not to be....

Maybe if we were willing to recognize there are influences beyond our imagination we would be more inclined to tolerate different outcomes to our goals?


Monday, January 13, 2014

DIY Heat


 This past fall we began gathering wood for our winters heat.  On one particularly beautiful fall day my husband and I headed out to gather the split wood from trees he had already dropped for one reason or another.   


Immature Sweet Gum seed pod


We choose trees that are nuisance trees like sweet gums.  I hate to call any tree a nuisance but sweet gums drop seed pods that get in our sheep's wool and create major havoc.  We choose trees that might have been hit by lightening, or others that if we don't take them down they're coming down on their own.  An amazing tid bit of information I've learned through my  recent wood burning experience is that each tree variety produces a different quality of heat.


My right hand is on the gas lever


We have a great system working together.  My husband John uses the chain saw and cuts the logs.  I place each log into the wood splitter.  The gas powered splitter feeds the log into a steel wedge that splits the log.  Each log gets split in two, then each 1/2 gets split in 1/2 again.  So, each log is    basically split into 4.  

                 Shall we say it is then, a "pretty log"?


After the logs are all split we are ready to transport and stack them in one of the buildings near the house where they can dry and age.  This way we have easy access to the wood at all times.


 I realized as we gathered our wood how much I appreciate our heat.  With each crackle of the flames, the scent of  smoke and ash, and last but far from least, the increase in our  indoor temperature...I am so appreciative.  

I am not criticizing anyone's enjoyment of their automated heat systems.  I have sure enjoyed them over the years.  I  certainly appreciate the existence of an automated heat source as I clean up the residue from our wood burning stove.  I appreciate the automatic response of the temperature control panel...heat on demand!

I also appreciate knowing the difference.  I appreciate being in a place in my life that I am reminded that warmth didn't always come so easily.  


Do you think being able to realize the difference(s) helps us appreciate what we have?